1. The Basics
I wonder how many binoculars are in households where they are little used, because the family does not really know how to use them? Such a shame as there is a hidden often wonderful world on the other side of the binocular. Be it wildlife or the stars in the sky.
Most binoculars have figures on them like 8 x 40 for example. The 8 x means that the scene you will view is 8 times bigger than the view with the naked eye, or that you are in effect carried 8 times closer into that scene, but still with the perspective as seen from your observing position. The second figure is simply the diameter of the main lens in millimetres.
Focusing
90% of binoculars have a central knurled wheel which focuses both eyepieces to suit the user and the distance of the object that you want to see up close. In addition the right eyepiece is usually capable of being further focused on its own, this is to accommodate any differences the user may have in the correction prescription they have for each eye. Close your right eye and focus the binocular with the central wheel for your left eye, now open the right eye and slowly turn the right eyepiece back and forth to get the best view for your right eye. Now only use the central wheel to focus with both eyes open. You might need to do this a few time to get the best setting for the right eyepiece. You will find that close objects like birds on your bird feeder will need a different central wheel focus position than for objects at a longer distance. Focusing becomes a little more critical at close distances.
Types of binocular
There are generally speaking two types of binocular, the roof prism type and the porro prism type. The roof type, look like a pair of straight telescopes strapped side by side, and the porro prism type have that familiar cranked look.
As roof prisms are more difficult to make, they are therefore more expensive than porro. They are often made with smaller prisms and with a smaller field of view than similarly priced porro prism binoculars.
I am suggesting that you may well get the same performance from porros that are half the price of the roof prism, but the poro’s are of course more bulky and heavy.
I do have a Foton 5 x 25 Russian binocular with roof prisms and it is delightful. Strangely the objective lenses measure 30mm dia and the exit pupil is 5mm. The optics have all the attributes of a very high quality binocular
2. Real field of view and Apparent field of view
Some manufacturers print the real field of view in degrees on the binocular, and some print the width of the real field of view in feet at a distance of 1000yds. Some print it in metres at 1000metres. If you feel the desire to convert feet at 1000yds into degrees, just divide the number of feet by 52.5. If you want to convert the metric units, divide the field in meters by 17 to give degrees. This simple method is a very close approximation and works well for the shallow angle involved.
Binoculars can have eyepieces of quite different designs, some giving a wider field of view than others for the same magnification.
When you look into the eyepiece you will see that the field of view is limited to a circular image as though you are looking through a hole in a washer. Well in effect that is exactly what you are doing and it is called the field stop and it is part of the eyepiece. When the binocular is correctly focused the image formed by the object glass falls on the same plane as the field stop and is then examined by you through the lenses in the eyepiece. The angular diameter of the field stop, as it appears to the viewer’s eye, is called the apparent field of view of the eyepiece and may vary from 50 to 70degrees and over. The real field is the apparent field divided by the magnification. Binoculars are often described wide field and extra wide field. I would say those with eyepieces with apparent fields of 70degrees or more are “extra wide field”, and those with an apparent field of 60 are wide field. With the real observable field being the apparent field divided by the magnification figure, it can be seen that the lower the power the wider will be the real field. For example a 6x power binocular will have twice the field of a 12x binocular, providing that they both have the same design type of eyepiece, with the same apparent field of view and focal length.
Because their objective lenses are wider apart, porro prism binoculars of normal configuration give greater stereoscopy than roof prism binoculars. This is fine and desirable from say 50 feet to infinity but you may find it a little too much at 12 feet or so.
3. Resolution. You can read that the theoretical maximum resolution of a telescope object glass is purely dependent on its aperture. In practice the finest detail you can see depends not only on the aperture, but also what magnification you are using, the image contrast and the seeing conditions. A 50mm lens is never going to show its full resolution capabilities at the lowly magnification of the typical binocular. If the 50mm optic is very good, it will be capable of supporting an observing magnification of around 66x with an exit pupil of 0.75mm. For me, this magnification is about the limit for a 50mm f15 lens. I see all sorts of debris in my eye when using an exit pupil of half a millimetre. In a nutshell binoculars are working at a magnification way below their capable resolution. Amateur telescope makers who grind polish and figure their own telescope mirrors, strive to achieve a surface accuracy of one tenth of a light wave. The telescope will then, at its optimum magnification, give a resolution that is limited only by its aperture and the wave nature of light itself. And the seeing conditions of course.
4. Image sharpness.
Sharpness of view, as long as the objective and eyepieces lenses are of good design and figure, it then depends on the accuracy of the glass surfaces and goodness of polish of all the surfaces in the optical train. Every time the light entering a binocular passes through or is refracted by any of the optical surfaces, the image information it is carrying, is degraded by any departures from perfection in those surfaces. This of course is an accumulative error as is any light loss by reflection at those surfaces. I am guessing here now, but I would think that clever work has been done by the designers and manufacturers of binocular optics, whereby the figure of accuracy of the optical surfaces is quality controlled such that at the low magnifications used, the perceived sharpness by the user will be optimum. The higher the magnification the better the optical surfaces will have to be to still give the viewer a sharpness of image, limited only by how good the user’s eyes are. Although sharp the view can be lacking in contrast and spoiled by contamination on the optics within the instrument, and less than perfect control of off axis bright light.
5. Depth of field
Comparing two binoculars, a 7 x 30 and a 7 x 50, the “in focus” depth of field will most likely be greater in the binoculars with smaller object glasses. The mechanism here is much the same as comparing the depth of field when having ones camera set at f 8 and f 4, where the setting is f8 more of the view will appear to be in focus. However when observing with one’s eyes as opposed to a camera chip, we have the ability to apply our eye’s focusing mechanism to the binoculars scene thereby giving a greater perceived depth of field. We have to consider too, the variable diameter of our eye pupil compared to the fixed diameter of the binoculars exit pupil. If the view is sunny our eye pupil may well be half the diameter of a 7×50’s 7mm exit pupil. This will effectively “stop down” the binoculars’ apertures thereby the depth of field will appear greater. Lower magnification will also increase the depth of field.
On a bright day, my 7×50 Fujinon seems to focus from infinity to about 100ft. It’s is only when focusing closer that the reduced depth of field starts to become noticeable. At around 20 feet or less one really needs to have one finger on the focus wheel all the time to follow the movement of birds around the feeders.
6. Exit pupils
The exit pupil is that little disc of light that you see floating near the eyepiece, when you hold the bins about a foot from your eyes. Its diameter is the diameter of the big lenses divided by the magnification. It carries all the image information through your eye pupil to your retina.
We often read how our own eye pupil limits the brightness of the view we get through binoculars, it is highlighted that where the binoculars exit pupil is bigger than the eye pupil, some of the light from the object glass will be wasted. True, but this is not the whole usage story. When the exit pupil is larger than the eye pupil, it is easier to set the interpupillary distance (the distance our eyes are apart) to match that of our eyes, plus, and a big plus at that, it is easier to keep our eye pupils fully illuminated with no annoying dimming, especially on board a moving vehicle. Consider the scenario where you have your eye pupil the same as the binoculars exit pupil. The likely-hood of you getting a perfect positional match is minimal.
7. Collimation effects
Binoculars have three axes, the two optical axes and the hinge axis. Ideally all three should be parallel. In daylight use and with the optical axes wrongly set, one can feel a nasty pull on the eyes as the brain tries to rotate each of our eyeballs to pull together the images from each half of the binocular.
Looking at the moon in a dark sky, it is easier to observe the effects of poor collimation. The moon will appear as two overlapping images. These may appear to drift together if the error is slight, with only a little pull felt in the eyes. When relaxing the eyes and gazing on a target at 100M the optical axis of each eye is almost parallel, but when we read a book at a distance of about a foot, we go a little cross-eyed. We don’t find this difficult as it is quite natural.
We cannot tolerate collimation errors that ask us to do the opposite.
7. DIY Collimation
If the hinge axis is true to the two optical axes, when we change the interpupillary distance from 60mm to say 70mm, to suit another person, we are in effect rotating both telescope slightly, but this case it will not change the collimation.
It is possible with the right tools to correct collimation errors to an acceptable level where we will not feel that unpleasant pull on our eyeballs as they try to misalign themselves from their normal position,
If you are fortunate, after unscrewing the object glass bezel you will have easy access to a two slotted ring that clamps the lens cell. This cell, that houses the lens, has an eccentric periphery. This eccentric cell often has one or two holes in its edge, this allows you to rotate the lens cell with respect to the binocular body, and by trial and error, set it in a position that gives you comfortable viewing with no eyestrain.
How I do this is to firstly set my binocular at my interpupillary distance, (this sets the hinge at the angle at which I will be using the binocular), then rest and hold it on top of my camera tripod, so I can look through each eyepiece in turn with my right eye without disturbing the binocular. My aim is to view a distant TV antenna and position the binocular so that I can view the antenna in the centre of the field of view. I then move my head to view through the other eyepiece.
The task is to rotate the individual lens cells so the distant object appears in the centre of the field of view in both eyepieces. This should give you a relaxed view on a distant object. As you bring the binocular away from your eyes they should still feel relaxed and not have to readjust to the naked eye view too much. Make sure the cell does not rotate off your chosen position as you gently tighten the clamp ring. I have never tried to find the prism adjusting screws under the finished skin of my binoculars.
After aligning the two optical axes, any residual error related to the hinge axis i.e. when changing the interpupillary distance by 5mm is most likely to be small and not really noticeable in use. A special collimating optical bench as used in industry for collimating binoculars, will be capable of examining and quantifying these errors.
8. Actually using the binocular
If you try to look directly at the edges of the field of view, by rotating your eyes in their sockets they can move off the exit pupil introducing dark patches. If however you are observing with a 7 x 50 you do at least have a little space to move your typically daytime 3 to 4mm eye pupil, within the 7mm exit pupil of the binocular. I fancy that talk of observable edge to edge sharpness is a bit of a myth as you can’t actually look at it with your cone cells unless you move your head across the eyepieces. Whoever does that when observing?
We instinctively move the binocular to bring the prime target into the middle of the view. If we lock our eyes onto the centre of the field of view, we let or peripheral vision do what it’s best at i.e. spotting movement and detecting dim objects. The binoculars edge clarity is generally not too important as our peripheral vision definition is very poor. We are however very critical of definition dead on centre.
If you have good bins’ do try and wear your specs, especially if you suffer from astigmatism, as I do.
At magnifications over about 8x unless the binocular is tripod mounted, or with arms rested or the binocular is image stabilised, we are only going to catch glimpses of the fine detail that the instrument is capable of delivering.
If you are standing and hand holding your binocular, I doubt you will see much more than a tantalising glimpse of finer detail at 12x than you would see at 6 or 7x. The smallest aid used to stabilise ones hold, will reveal finer detail when using higher magnifications.
Another important feature to come to grips with is what is called “eye relief.” No this is not two discs of cucumber it is the distance of your eye pupil from the glass in the eyepiece, when you are viewing. If you wear spectacles all of the time, this is very important to you, as you need an eye relief of about 17mm, to accommodate the bulk of the spectacle lens between you and the binocular eyepiece. Check this distance on the specification list for any binocular you intend to buy.
Bird-watching binoculars
The expression ‘horses for courses’ is particularly apt when choosing binoculars for bird-watching, The habitat and circumstances in which you generally carry out your observations can influence the choice of binocular specification to some extent but bear in mind there is obviously room for much overlap here. In reality, any binocular may be used in any habitat to observe any bird but an informed choice will enhance the experience.
Here are a few of some of the most commonly available binocular specifications with a suggested guide as to their birding applications:
7×50, using a lower magnification with its 7mm exit pupil, the 7 x 50 provides an increase in image stability when used on board a boat observing seabirds.
In near darkness conditions where one’s own eye pupil expands to take advantage of the 7 x 50s large exit pupil, it will enhance the viewing of crepuscular species such as owls or Nightjars.
8×32, are small fast handling bins good for general observing and ideal in enclosed habitats such as woodland where quick acquisition of the target is essential. This type can often focus down to approx. 6ft and is also great for observing butterflies.
8×40, same magnification but the larger objective lens gives a little extra light grasp for those darker situations. As long as your eye pupil is big enough to take advantage of this.
10×50 the extra magnification with possibly a reduced field of view can make quick location of targets difficult in enclosed habitats. However, they really come into their own when used for longer distance viewing on open habitats such as farmland, reservoirs and estuaries.
Always check the field of view and closest focus before making purchase, as this can be quite variable from type to type and from model to model.
A word of WARNING here: When following the flight of birds in open countryside it is very easy to be unaware of them flying between you and the sun. If you happen to get even the briefest view of the sun through a binocular it could result in permanent blindness. Try always to keep the sun at your back. It’s better for viewing anyway.
Binoculars for astronomy
Any binocular will enhance ones view of the night sky. If you can hold them steady enough you can see the 4 bright moons of Jupiter with a 10 x 50. You can even see them change position from night to night, or perhaps hour to hour if a chance alignment gives you a reference point. Download the free software “Winjupos”, and clicking program/celestial body/Jupiter / tools/ ephemerides, put in your date, the universal time(ut) of your observation and location, then click Graphic, and you will see the moons as you saw them plus their names.
10 x 50 is a good all round binocular, when you want to include astronomy.
Going bigger with the aid of a tripod, the view of the Pleiades through a 20 x 80 will blow your socks off.
The binocular view as opposed to a telescopic view will get your brain thinking it’s viewing in 3D. It’s an illusion of course but you try telling your brain that, It will never believe you. If you have chosen well your 20 x 80 binocular will have field of view of 3.5 degrees, the whole of the Andromeda galaxy will just fit this nicely. Break out the sun-lounger wrap up warm and enjoy.
The Swift porro prism binoculars.
I have built up a small collection of this make. They are very reasonably priced on e-bay and much revered, with a lifespan of over 60 years. They are very nice bits of mechanical and optical engineering and are built to last.
1. 8 x 30 Swift Apollo the early one and a MK2. The early example really is a little gem. The Mk2 has a slightly wider field of view of 8.5 degrees but this extra is not really noticeable in use. Weight 1lb 8ozs.
2. 8 x 40 Swift Grand Prix1980 model. This is another gem, and very small for an 8 x 40, a delight to use. Weight 1lb 8ozs and a field of view 7.5 degrees although it seems smaller, but the view is excellent.
3. 8 x 40 Swift Saratoga Mk2 This is a beefy chap a real muscle bin, big eyepieces big prisms, big shoulders and a big field of view of 9.3degrees. It gives a very “immersive” clear, sharp and bright view. Weight 2lbs 2ozs.
4. 10 x 50 Swift Newport ( Mk1) 1967 vintage. This is a very nice heavyweight binocular, weighing in at 2lbs 10ozs. Very much like the Saratoga in size but more rangy with its longer barrels housing the 50mm lenses. The field of view is 7 degrees, which is wide for a 10x mag.
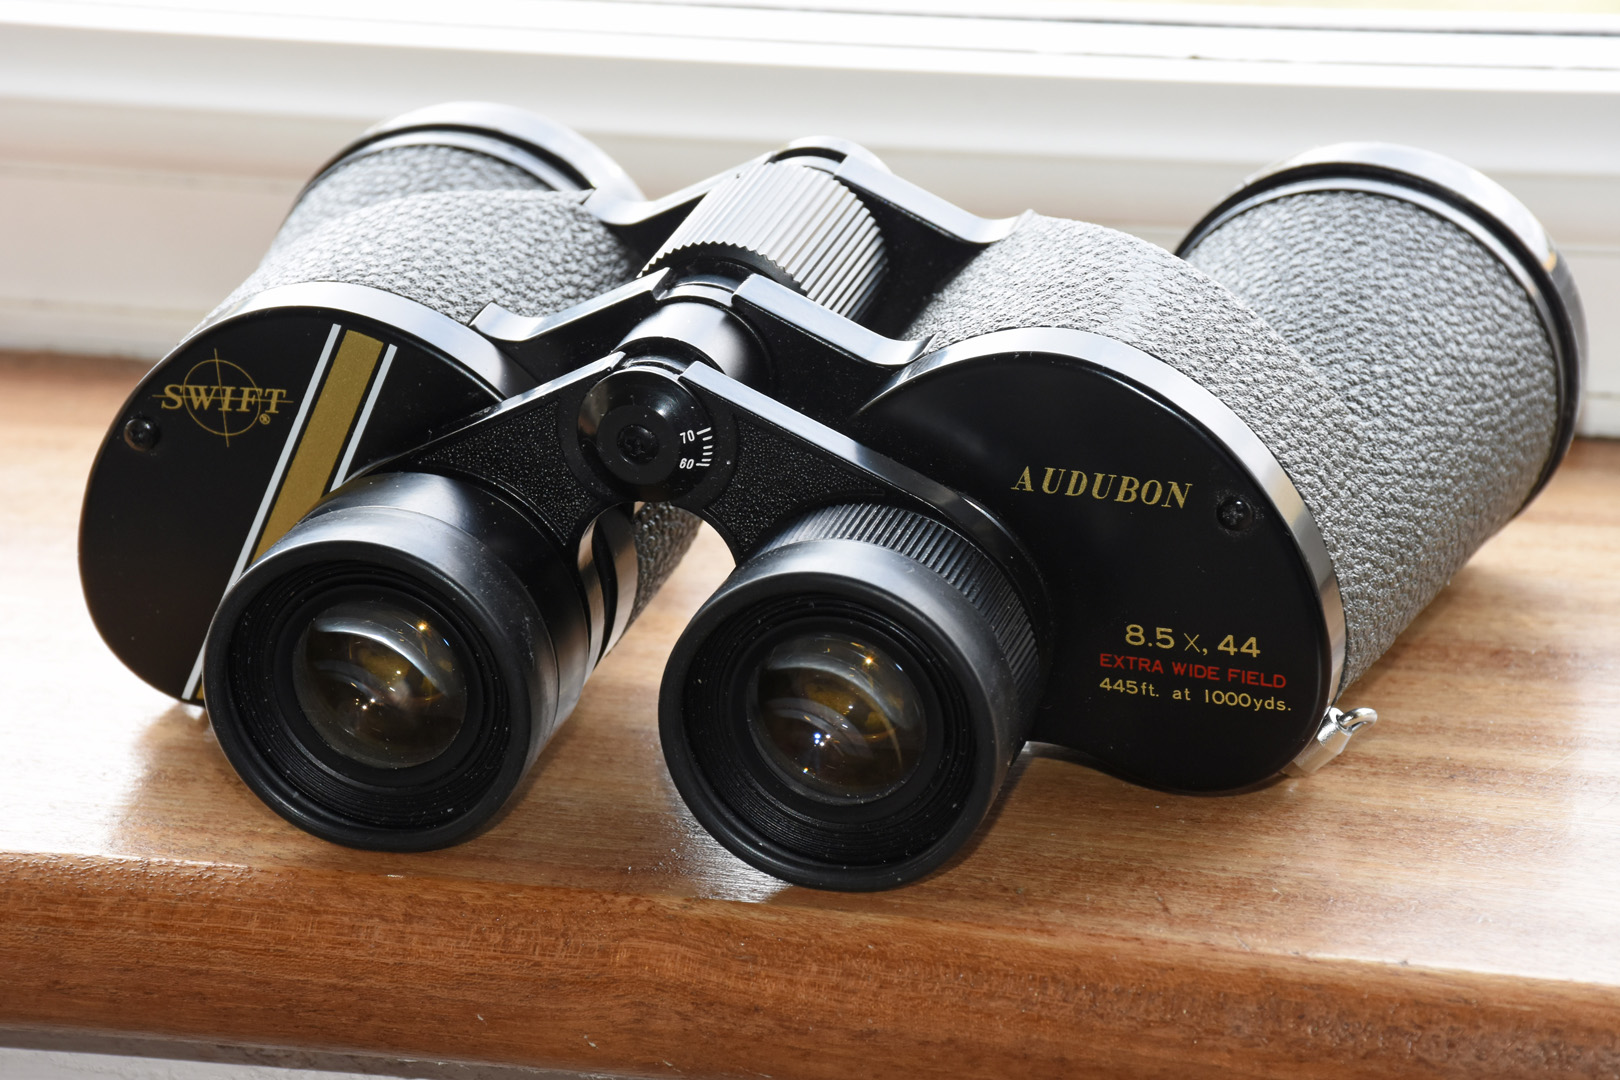
5. 8.5 x 44 Swift Audubon This is the cream of the bunch just that bit brighter, and with a little more contrast than the rest, it’s up there with the best of them, with an 8.5 degree field of view ( on my two 1979 gold stripe versions). Prices range from £50 for a less than perfect example to £200 for a mint example (in 2018).
6. Swift Triton 7 x 35 extra wide angle , this is fantastic ( well at least my example is ) I prefer to use it with the rubber eyecups removed to get full access to the 12 degree field of view. The mag’ of 7 x the 12 degree field of view = an apparent field of view of 84 degrees, which is the widest I have heard of.
7. Swift Belmont Deluxe 10 x 50 Extra Wide Field of 7 degrees which at 10 x mag and 7 degrees real field. Multiplying 7 times 10, says it is using healthy 70 degree apparent field eyepieces. My example is a real delight , it looks new the optics look and perform like new. Cost, £17:70 + £3:60 P&P off e-bay! It is not as heavily built as the Saratoga and Newport. Weight exactly 2lbs
8. Swift S.P. 8 x 40 The SP standing for Swift Pyser You read various reports of better or poorer examples of Swift binoculars on birder and stargazing forums, but out of the eleven I own I have not had a dud one apart from hidden damage ( which I fixed). I do ask the seller to actually look though my prospective purchase to make sure the view is not hazy, as that can be a spoiler, on even a cosmetically mint binocular. A small amount of fungus is not too detrimental to the view. Ok if the “collector bug” bites you you might continue to search for mint examples with perfect optics, for the shear hell of it.
9. Swift Skipper Mk1 these are a 7x power version of the 10x Newport, and very nice they are too. Same heavy weight as the Newport, but the lower power make them that little bit easier to use.
Concluding
I hope I have managed to convey some useful information to you, that will enable you to make an informed choice the next time you purchase a binocular.
Maybe I have inspired you to dig out Dad’s old binocular that has been resting in the back of the wardrobe for the last 20 years.